Showing posts with label crafting. Show all posts

Thursday, March 22, 2018

Zirrly Super Beads Mega Pack

 
I always enjoy it when the Homeschool Review Crew receives supplemental items to review, like this fun craft set by Zirrly, the Super Beads Mega Pack. Those who are familiar with fuse beads may be interested by these new Super Beads, because they have a feature that I think is fantastic! Rather than being fused together with heat from an iron, these beads fuse together simply with water! A craft project that you can take with you anywhere, even off the grid! :)


The kit we received for review is the Mega Pack, which comes with 4500 super beads, 4 design board grids (that snap together to make one large design board, if you have a really ambitious child/project to complete), 4 assorted design templates (in quintuplicate ;)), a design tool to assist with placement of beads sometimes, and removal of design when it is finished, as well as a set of instructions.


My boys and I all decided to get involved in this project (because, who can resist the lure of fuse beads? ;)). I have spent many hours in the past crafting along with my eldest and middlest when they were younger, and nothing has changed.

I decided to see if I could create a cube for my Eldest who is away at college. Her school's colors are blue and white (M for Messiah, F for Falcons) and her initials. The other two panels represent two of her favorite things to photograph, flowers and snowflakes.

It's still a work in progress, but I'm getting there.

Middlest is a fishing fanatic, and he's done other artwork that has shown up in my reviews that were fishy based. Once again, he has crafted a Bass...

Youngest immediately saw the relation between the beads and the pixelated world of Minecraft, so he decided to make some minecraft heads. He did the math in * his * head, and figured out how many of each color of beads he would need to complete each one. We discovered that there are more red, white, and blue beads than any other color, which made looking for greens, blacks, and browns a little more difficult (however, it worked well for my college colors purposes. ;)). As a result, he experimented with different color combinations for his heads, which I think was pretty nifty. He also had a pattern set in his head, so it was easy for him to complete each one.


As with any set of mixed beads, no matter the type, it's always easier to work on if they are sorted out, so it was my habit to grab a handful of beads and sort them into an empty ice cube tray as I was looking for my particular colors. You can see it in the photo to the left. Made it sooo much easier for us all further down the road as we looked for specific colors. I was a little surprised that there were only a few blacks and oranges included, as black is a pretty basic color, and my youngest would have appreciated more browns (for his minecraft camo colors...), but overall, I am very pleased with the variety of colors available to play with.

A few learning curve notes:
~ one ~ make sure that the beads are all facing the same direction. ie there is a top (with a line) and a bottom. ;) You can see the first attempt at the fish, I forgot to give that information to Middlest, and you can see that the beads don't sit as uniformly (disregard the fact that some are sideways, it got knocked into... :p ).
~ two ~ it may take a few tries with the tool to remove some of the projects~ the right touch that is gentle enough not to pull the beads apart... it took me a few tries before I got it right. The good news is that if a couple of beads break off, all you have to do is put them back and spritz with water.
~ three ~ don't soak the beads! Just spritz them. It will take them far longer to dry. And don't forget to tap the board to remove excess water, as that also extends the drying time.

close up of the beads once spritzed~
You can see them starting to join together! 
All in all, I think this is a great project to pull out on a rainy day, during spring or summer vacation... any time that your kids need a little extra something to keep their hands and minds occupied. I also appreciate that it is an exercise in plotting and planning, and can be used for math/graphing exercises as well. In the future, I hope to pull up some cross stitch patterns and let those be used to create some items as well. Fun stuff! :)


Not So Nutty Nitty Gritty 
You can visit Zirrly on their social media pages on Facebook, Pinterest, Instagram and YouTube

Please click the banner below to visit the TOS Homeschool Review Crew and see what others had to say about this and other Zirrly kits. As always, I hope that this review was useful to you as you choose where best to spend your homeschool budget.
Blessings~
Click to read Crew Reviews
Crew Disclaimer
#hsreviews  #zirrly_  #zirrly  #superbeads  #waterbeads  #fusebead  #fusebeads 

Thursday, January 25, 2018

Throw Back Thursday (The Martha years?)


Bear with me~ I have a little story that goes along with these pictures... ☺

How many of you have read the Little House on the Prairie series of books? They are among my very favorites. My mother gave me a boxed set when I was little, and I *know* I read through the complete set at least 8 or 9 times. I loved those stories! My set of books was passed down to nieces, for their reading pleasure, and I lost touch with them Little House, although I still carried fond memories in my heart. 

Fast forward to the early 1990's as a newly-wed. We were living with the family I nannied for, and had a small "open air" apartment, with a tiny kitchen that was furnished with basic pots and pans. As I learned to cook and experiment more, I thought I really would like a new set of pots and pans (Calphalon non-stick was "the thing" at the time...). 

Christmas rolled around, and there was a large, heavy box under the tree with my name on it. I was just positive that my sweetie had gotten me that set of pots and pans that I wanted. Boy was I surprised when I opened the box and discovered a hardcover set of Laura Ingalls Wilder's Little House on the Prairie series! (awwww... how lovely! and sweet! and romantic!) ❤☺❤

Suffice it to say that I passed on my appreciation for the Little House books to my daughter, and my youngest son (middlest~ is less of a reader, shall we say, unless it has to do with fishing... ☺ )

So, many years after my introduction to Laura's life, we discovered that there were "prequel" sets of books that follow Laura's mother (The Caroline Years), grandmother (The Charlotte Years), and great-grandmother (The Martha Years).

Last night, as my youngest was observing my struggles with the wool roving (it kept breaking before I could get it spun into a strong thread/yearn that would hold, or was going from thin thread to thick slubs with very little consistency), he commented to me "You know, Mom, Martha used her drop spindle to make yarn while she was walking..." ☺.......rolling......☺ (or should that be spinning?)

So, no, I'm not very competent with this old-fashioned skill, and as I told him, I'm working on it... but hopefully my imperfect product will become a picture-perfect backdrop for someone else's artistic endeavors.


Further back story ~ I was already starting another snowflake "backdrop" piece, but was lamenting the absence of a cranberry colored yarn... and then I remembered! I had wool roving up in the attic that might fit the bill perfectly~ that just meant I'd have to locate my drop spindle and remember how to use it! And THEN I saw all the other pretty roving I had, and well... the rest is very recent history. ☺

I love my kids! ❤

Blessings~

Friday, September 22, 2017

HOT Glue gun Review

Being a crafty type, being a mom, and being a homeschooler, glue guns are one of those tools that are somewhat regularly in use. For YEARS, I've only used the low temp glue guns, due to having small children around, and wanting to avoid potential hazards. However, my youngest is now 10, and I *think* I can relax my guard just a little bit.

I was please to be offered the opportunity to review a HOT glue gun, because sometimes the low temp guns just don't quite have what it takes to STICK. :/


The Cobiz Hot Melt Glue Gun with 60/100 W power options has been working well for my intended projects, as well as at least one un-intended project.


Same youngest mentioned above had a run in with a bad hop baseball, which broke the earpiece near the temple of his glasses. When his glasses broke before we tried super glue (nope) and duct tape, but they were extremely shaky "fixes." With this new Hot Melt glue gun, I am happy to say that the glasses are holding up pretty well, and will hopefully make it until he's due for his next appt in a month, when he can get new glasses! (Did I mention this is the second time the frames have broken~ insurance won't pay twice... ;/ )

I haven't had quite as much free time as I would like to try out some cool projects with my son (we have some mica that wants to be attached to something... but we haven't found the right something just yet)

However, I wanted to check it out, anyway, so I made a nifty little "pallet" coaster to hold my icy water cups on the side table in the living room, in the hopes of reducing condensation damage to the table
Glue gun heating up~ I could wish that the wire stand was a little more sturdy~ makes me a little nervous, but haven't had any trouble with it yet... 
See how fine the glue drops? I'm pretty happy with that! :) 

A couple of notes: The glue gun took a little longer than I expected to heat up and allow me to feed the glue stick through the first time (closer to 10 minutes), but it was much closer to the target 5 minute time the next time I used it.

I didn't actually use the 100W power because the projects I had required small streams of glue, and my understanding is that the higher power creates a thicker stream of glue.
The 60W stream of glue from this gun is FAR superior to anything any of my low temp glue guns ever put out... Those popsicle sticks aren't budging! :)

All in all, I'm pretty impressed and pleased with this glue gun, and can't wait to put it into action getting my crafty on. ;)
Blessings~


Monday, July 31, 2017

Summer Projects? Paper mache and Plaster Wrap Crafting/Sculpting Kit


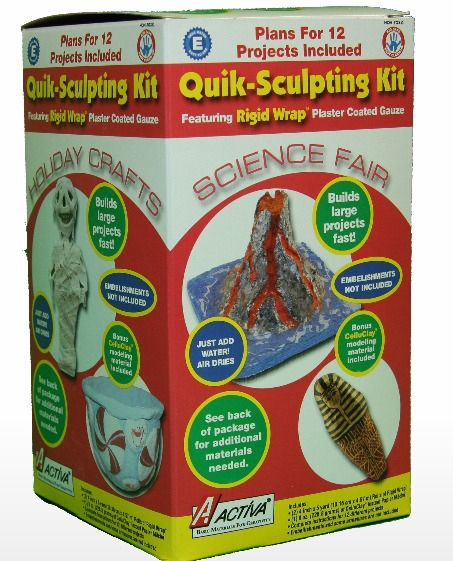
Warm weather offers a great opportunity to get outside (If you live where it isn't 100 degrees F +) and do some of those messy projects which you hesitate to do indoors, using products like one of our latest review items, the Rigid Wrap and CelluClay Quik-Sculpting Kit by ACTÍVA Products.

Before I talk about some of the process of our current creative efforts, I want to mention that these products are also good for the older students and creative folks in general (however, I used this with my 10 year old, so that is more what I'll be talking about). There are a bunch of fun things that can be done mixed-media style with CelluClay, an "instant" paper mache, as well as with Rigid Wrap, which is a plaster cloth gauze, similar to what would be used to make a plaster cast for a broken bone. I have used something like Rigid Wrap in the long ago past to make napkin rings (wrapping the plaster cloth around toilet paper tubes that were cut in one to two inch segments). I appreciate that ACTÍVA Products offers this kind of art supply in a non-toxic, non-carcinogenic form, and for those with sensitivities they will be happy to know that the products are also wheat and gluten free.

Alright,  on with the review! :)

Youngest had been talking about wanting to make a bowl for some time (One of the project options in his AWANA book last year), so while the timing wasn't perfect for us (Would have loved to do this before he completed his book in May), he was quite pleased to be given the opportunity to make one just for the fun of it.
Contents of kit~ 2 packs of Rigid Wrap, 1 package of CelluClay, and an instruction sheet.
Last photo shows that we used about 1/2 of a roll of Rigid Wrap for our project.
We loosely followed the instructions for his bowl using the instructions for "How to Create a Peppermint Candy Bowl" found in the free, downloadable e-book ACTÍVA Products' Favorite Sculpture KIDS CRAFTS. *Note: There are a variety of projects found in the book, mostly for the elementary crowd, especially if they are studying American Indians (totem pole) or Ancient Egypt (Sarcophagus).

  • Step one: Choose a pleasing shaped bowl to use for your model (preferably plastic) and cover well with Plastic wrap.
  • Step two: Assemble the rest of your items... scissors for cutting the Rigid Wrap, a vessel for holding warm water, and a work surface. We used a styrofoam tray inside a shallow cardboard box to make clean up on our porch easy-peasy! 
  • Step three (shown in 2nd picture): Cut Rigid Wrap into workable strips. Since we were covering a bowl, I thought triangles would do the best job, with the fewest wrinkles. 
  • Step 4: Begin covering the bowl, wetting the strips in the warm water (Styrofoam tray), and smoothing them on~ making sure to overlap some to give strength. 
  • Steps 5&6: Add at least two more layers on the base layer
  • Step 7: Add some decoration if you'd like. We added the wavy line by folding some longer strips of Rigid Wrap and squishing them into a rope when it was wet. *Note... we added a base to the bowl, but it may have been a little too dry by the time we did so, so that doesn't show up in the finished product... it fell off.
  • Step 8: Let it dry!!! 
    • *I will note that the instructions talk about 15 minute drying times, but I think that might be for a single layer, in dry humidity. It was probably 80+ humidity the day we worked on this, and we had three layers~ it still wasn't dry overnight~ 
      • Remedy... we microwaved it for 30 seconds at a time~ it took 2 or 3 times before I was comfortable that it was done. 
  • Step 9: Paint it! You will see in the finished photo that the inside has a nice texture~ we chose not to dab paint into all the wrinkles the plastic wrap left, and really like the way it turned out! 

  • Step 10: Coat with a protective gloss (we used Modpodge) and let dry. 

Youngest is pretty happy with his final product


While I don't recommend using it for chips or fruits, it makes a perfectly acceptable receptacle for wrapped treats! Youngest is very happy to have something to display his birthday goodies in (and offer them around upon occasion as well...). 


We didn't have time to complete a project with the CelluClay pack before we left on a two week road trip, but I have some great ideas for it. I always have ideas to use with paper mache, so I am looking forward to having a chance to do some of them with Youngest at a later date. And who knows, maybe he'll crank out some napkin rings to use for gifts later on this fall. If you are at all "crafty" this kit is worth a look!

Not So Nutty Nitty Gritty 
Visit ACTÍVA Products on their social media pages:


Please click the banner below to visit the TOS Homeschool Review Crew and see what others had to say. As always, I hope that this review was useful to you as you choose where best to spend your homeschool budget.
Blessings~
Click to read Crew Reviews
Crew Disclaimer
 #hsreviews  #activaproject 

Tuesday, July 23, 2013

Summer Art~ Dragonflies

Just a quick little post tonight~
I often run across something I want to do, and bookmark it, or lately, just keep the tab open on my iPad. That way it is fresh in my brain!

It took me 2 weeks to get to this one, so we weren't able to submit it to Harmony Fine Arts at Home's "Slideshow" for the week of July 9.... but better late than never!


Youngest and I made pastel chalk dragonflies on a large drawing pad~ plenty of room for us to work side-by-side on the front porch. We followed this "Assignment" found on Barb's site by Tricia at Southern Hodgepodge. I've used a couple of her other projects, and they are very well done. I've not found the funds just yet to purchase her book, but it's on my wishlist. :)

If you try this project, I'd love to see the results!

Blessings~


Tuesday, January 15, 2013

The Last Days of Christmas... ;) (Including a finshed project!)

Goodness... I was doing so well getting pictures and posts of our "Days of Christmas", and then we all got sick. :( I think that it was a mild form of flu, but it definitely knocked us out for a while. Needless to say, we weren't feeling terribly photogenic, so although we did open presents, we did NOT record them digitally.

I do have one more photo from when it was still "Christmas"... the day of the Tiniest (For the Eldest), the Biggest (For the Middlest) and the Middlest (For the Littlest). Eldest received her traditional charm from her daddy (a sparkly bee this year), Middlest received a salt-water fishing rod, and Littlest received a new game (Zitternix). The variety of sizes was rather fun! :) 

Youngest decided that he needed to balance the Zitternix box before opening it up.... ;) Who knew? This is a rather fun little game~ a version of pick up sticks that is fun to play, and easier to "Regulate" as there is no "Judgement call" on whether a stick wiggles or not. 


Remember that photo of eldest holding the raw materials for a hat? Guess what I finished? :D (No ear flaps, though, she wasn't as set on them as I thought) 

Didn't it turn out pretty? I thought it reminded me of the dawn, but my nightowl instantly determined that it was like a sunset over the water. :) The Blue and Brown are baby alpaca (Soooooo soft!) and the gold/oranges are wool. 

Gadzooks! Check out the day-glo effect with the flash on!  ----->
The other photos are more true to the actual colors.   
Blessings~

Followers

LinkWithin

Related Posts with Thumbnails